![]()
| Members | |
| Communications | |
| Conferences & Congresses | |
| Courses & Seminars | |
| Questions & Answers |
|
| Discussion Forum | |
| CEN | |
| Publications |
|
| Education |
|
| WFHSS Guidelines | |
| WFHSS Training Programme | |
| WFHSS WebShop | |
| Industrial Partners | |
| Commercial Announcements | |
| Related Sites & Links | |
| Vacancies | |
| Humour |
|

Developed by Baumeister Mediasoft Engineering
|
English | español HomeLogosNewsSearchSitemapContact |
The Sterile Supply Cycle: Cleaning
Author: Jan Huys
| TOP | CONTENTS | PREVIOUS | NEXT | BOTTOM |
Cleaning of Equipment and Materials to be Sterilized
|
|
|||||||||||||||||||
 |
|
||||||||||||||||||
| TOP | CONTENTS | PREVIOUS | NEXT | BOTTOM |
Contents


| TOP | CONTENTS | PREVIOUS | NEXT | BOTTOM |
Introduction
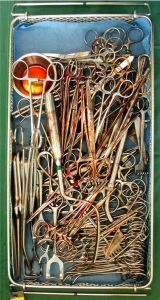 Figure 1: Cleaning is essential: An instrument set as it comes back from the operating theatre... |
Instruments and materials used during an operation will be covered with blood and remains of tissues; they may have been in touch with chemicals and fluids, dirt and dust. The tubing of hollow instruments may also will be full of these soils. In one way or the other, the items have to be reprocessed so that they can be safely used on another patient again. Cleaning plays an immensely important role in this process... A major requirement for equipment intended to be in touch with inner fluids of the body (the high risk areas) is that they should be sterile. However sterility (the absence of any viable organism) alone is not sufficient for safe use. An instrument, which is covered with sterile dirt or with remains of chemicals or corrosion, still is a serious health hazard. Thus all potentially dangerous soil or remains have to be removed. The health hazard caused by remaining soil (even when sterile) is only one of several reasons why goods to be sterilized, first have to be thoroughly cleaned before sterilization. |
Any instruments or materials that are to be sterilized, should be cleaned.
| TOP | CONTENTS | PREVIOUS | NEXT | BOTTOM |
Why cleaning of goods to be sterilized?
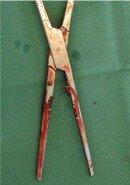 Figure 2: Soiled instrument |
1. Removal of all visible dirt, tissue, blood and foreign particles |
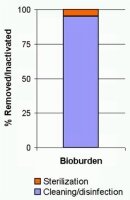 Figure 3: The vast majority of the bioburden should be removed by cleaning! |
2. Reduction of the bioburden |
By cleaning, the vast majority of the bioburden is removed. Thus
Cleaning is considered the most essential step in the sterile supply cycle
 Figure 4: Blood remains encrusted on instruments. |
3. Protection of instruments against corrosion |
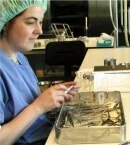 Figure 5: After cleaning/disinfection equipment can be handled more safely |
4. Ensure more safe movement of equipment and materials |
|
Summarizing the importance of cleaning of medical supplies:
|
The soils on used surgical instruments
After use in a medical procedure instruments and other materials will have attached to them a large quantity of blood and tissues. In addition there may be chemicals such as disinfectants, and other fluids. The majority of the soils however usually are the remains of tissues and blood; they contain proteins. When heating proteins above approx 50°C, they will start sticking together (like an egg becomes hard when boiling it). This sticking together is known as coagulation. In the hot water disinfection process or, subsequently during steam sterilization, the items are exposed to much higher temperatures and thus any, remaining protein residues will strongly attach themselves to the material. It therefore is essential that
- all these soils are removed before disinfection and/or sterilization
- the temperature of water, used for the pre-cleaning process is no more than 50°C.
Importance of quick cleaning after use
When organic soils such as blood, tissues, etc. are left to dry, they will adhere tightly to the underground and will as time passes, be more and more difficult to remove. (You experience this at home this when waiting a long time before cleaning the dishes after a meal). It therefore is essential that the materials are cleaned as soon as possible after their use. In some countries instrument sets are submerged in a disinfectant solution. This may solve the problem of drying up instruments, however these disinfectants also cause corrosion. Thus also in such case it is important to do the cleaning as soon as possible after use.
Cleaning procedure in the CSSD
After use, instrument sets usually arrive in their original trays in the cleaning section of the CSSD.
There are different opinions on the sequence of activities within the cleaning section. It will depend on the initial work done at the operating theatre and the way the materials are transported how instrument sets will arrive at the CSSD. When transporting is done dry as is practiced in many health facilities, the following sequence can be followed:
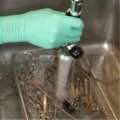 Figure 6: Flushing with hand shower |
1. Initial cleaning/flushing |
 Figure 7: Flushing with an automatic flusher or cleaning in an ultrasonic bath |
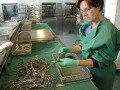 Figure 8: Sorting for manual cleaning and machine cleaning |
2. Sorting for manual cleaning and machine cleaning |
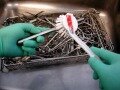 Figure 9: Manual cleaning |
3. Cleaning/disinfection |
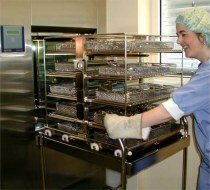
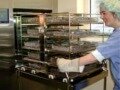 Figure 10: Unloading an automatic washer/disinfector |
 Figure 11: Inspection |
4. Verification of the cleaning and drying |
Note: In order to reduce risks for staff, in several countries the pre-cleaning of instruments, that have the capability of being placed directly into a washer-disinfector, is discouraged. In other words: whenever possible do machine cleaning only.
Cleaning: removing of all visible dirt, dust or other foreign material
| TOP | CONTENTS | PREVIOUS | NEXT | BOTTOM |
The cleaning action
When washing your hands, you will rub them for some time while using warm water and soap. After washing you will rinse your hands, in order to remove the remaining dirt and soap. Any adequate cleaning process involves the cleaning factors of this simple hand washing procedure.
 Figure 12: Cleaning circle: all factors are essential |
Water: the solvent: water is the carrier in which the soil is going to be dissolved or suspended and transported, away from the items to be washed. It provides the environment in which all cleaning actions take place |
Note: in order to prevent coagulation of tissues and blood, the temperature for pre-cleaning or neutral detergents should be limited to below approx 50°C. Alkaline detergents however, strongly depend on higher temperatures in order to hydrolyse (break down by means of water) protein residues. Therefore the temperature for the main cleaning needs to be the right one for the type of detergent.
The cleaning circle
The total cleaning action resulting in a clean product can be presented by a circle, with each factor indicating the relative contribution to the total cleaning action (cleaning circle according to Sinner). Depending on the method of cleaning that is used, the share of the individual cleaning factors will differ. Whereas in a manual cleaning process using a brush, the mechanical action contributes to a large extent to the cleaning result, in machine cleaning, the only mechanical action available is the flushing of the water. Thus in order to result in a similar cleanliness, the more of the other factors such as the chemistry and temperature will be needed.

|
 |
| Manual cleaning or ultrasonic cleaning: The vast majority of the cleaning action is caused by the mechanical action. | Machine cleaning: A large share of the cleaning action is now taken over by chemistry, temperature and time. |
| Figure 13: Comparing the contributions of the factors involved in manual cleaning and machine cleaning. | |
| TOP | CONTENTS | PREVIOUS | NEXT | BOTTOM |
Principles of the chemistry of cleaning
In the cleaning process, all soil is to be removed from the goods to be cleaned. This can be done by dissolving, or, when this is not possible, by breaking it up and bringing it into the water (bringing in suspension). Being in the water it then can be flushed away during the rinsing. Soils on medical equipment after surgical procedures will contain blood, tissues, fats and oils and all kind of chemicals. All these have to be removed. Water plays an essential role in the cleaning process. Soils, like fats cannot be diluted in water and are to be treated such that they will be suspended in water. Proteins, much larger then the fats also are not soluble in water, and should be broken down first into smaller particles that can than can be removed more easily. It is clear that understanding of cleaning requires in-depth understanding of the chemistry of cleaning: a dazzling complicated process of interactions of the objects to be cleaned, the soil, the cleaning agents and water. A whole industry has developed, producing sophisticated products for the cleaning of the wide range of materials. Detailed information is available in various publications and websites. For a basic understanding the chemistry of cleaning, this section takes a closer look at the ingredients involved in the cleaning process: the water and chemicals and how they are aided by mechanical action and temperature of the solution.
Water and cleaning
Water is an amazing fluid with fascinating properties. It is available abundantly; it is essential for all living beings. It is used in incredibly many ways in society, household and industry. It also plays a key role in the cleaning.
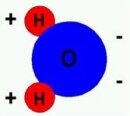 Figure 14: Chemical structure and polarity of the water molecule 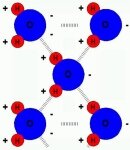 Figure 15: Hydrogen bond: Bond of neighbouring water molecules |
Water structure and water properties
These properties also affect the behaviour of water in the cleaning process. |
Problems related to cleaning with water
For adequate cleaning it is essential that soils are dissolved or somehow suspended into water allowing the soils to be flushed away. Water can dissolve many substances, however, unfortunately it has a number of properties that makes it not directly suitable for removing a number of soils such as the oils, fats and proteins. These however are the very substances so much present on used surgical instruments and materials! Somehow this problem has to be solved.
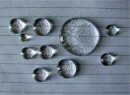 Figure 16: Pure water beads up due to surface tension of the water, thus inhibiting the cleaning process. |
Water prevents wetting of surfaces: surface tension |
 Figure 17: Vegetable oil floats on water. The oil will not dissolve in the water. |
Water cannot dissolve fats and oils |
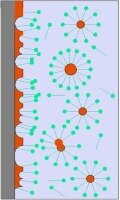
 Figure 18: Surfactants in soapy water cause the water to spread and adhere to the surface  Figure 19: Symbolic presentation of a surfactant molecule |
Improving cleaning capability of water: Surfactants (tensides) |

|
 |
 |
 |
| Object with a soil layer | The soil is pulled into suspension by the surfactant | All soil is suspended in the water | The water with the soil is flushed away. The object is clean. |
| Figure 20: Removing of soil with water to which a surfactant was added. Removal can be aided by a mechanical action such as brushing and flushing. | |||
Composition of water: water quality
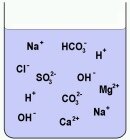 Figure 21: Water with ions of split-up minerals, acids and bases dissolved in it |
By nature, water contains a wide range of substances. It may contain dust and dirt particles, micro-organisms and minerals. Minerals are chemicals found in nature, such as cooking salt (NaCl), Gypsum (CaSO4), Calcium bicarbonate (CaHCO3) and many others. When diluted in water, these minerals usually are split up ions, which are charged particles. The split-up results in positively charged ions: the cations (attracted by a cathode, the name of a negative electrode), mainly Hydrogen and metal ions (K, Na, Ca, Fe, etc.) and negatively charged ions, the anions (attracted by the anode: a positive electrode). Anions are usually left-overs of acids and salts). The concentration of these ions in water very much depends on the geological structure of the site where the water is coming from. In areas with lots of calcium (lime) and magnesium, the water will contain ions of these metals. |
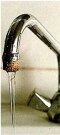 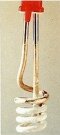 Figure 22: Deposits of scale near the outlet of a tap and on a heating element due to hard water |
Hard and soft water |
 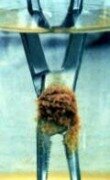 Figure 23: Pitting caused by chlorine (L). A surgical instrument put in salty water (R). |
Chlorides |
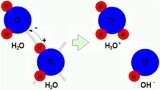 Figure 24: In pure water 1 in 10.000.000 molecules one of the H nuclei moves to another water molecule. The electron of the H atom is left in the donating ion causing the donor to be negative and the receptor to be positively charged. The result is a H3O+ and OH- ion. |
Acidity of water: pH |
 Figure 25: A surplus of H3O+ (or what is the same the H+) causes acidity. A surplus of OH- causes a fluid to be basic. Acids typically add H+ cause and increase of acidity/thus a lower Ph. Bases bring in OH- ions and cause a fluid to basic, increasing the pH. |
 Figure 26: Opaque and dark blue discoloured instruments due to silicates |
Silicates |
Improving water quality
The water quality has a great influence on the result of the cleaning process. Water analysis and water treatment are issues, which require specialist know-how. For planning your water treatment installation and solving problems related to water seek advice from organizations or companies with thorough experience and know-how. Here only a brief introduction on water treatment can be presented. Depending on the stage of the cleaning process a more or less high quality of water is required. High quality in this context means, water with a minimum of particles and minerals dissolved. The initial rinse may be normal piped drinking water. However the water for the final rinse should have a higher quality with a minimum of minerals dissolved in it. For improving the water quality used for the activities in the CSSD several methods are used.
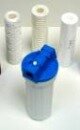 Figure 27: Water filter cartridges |
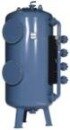 Figure 28: Large capacity water pre-filter |
Filtering: In order to remove major particles of dust and dirt floating in water, it is passed through a sieve or filter element or filter bed that catches small particles. The tighter the mesh of the sieve, the smaller the particles must be to pass through. Filtering is not sufficient to completely purify water, but it is often a necessary first step, since such particles can interfere with the more thorough purification methods or would clog-up these systems very quickly making them extremely expensive to be operated. Therefore usually a prefilter system is installed. |
 Figure 29: Typical water distilling plants, for small water quantities |
Distilling: Distillation involves boiling the water to produce water vapour. The water vapour then rises to a cooled surface where it can condense back into a liquid and be collected. Because the solutes are not normally vaporized, they remain in the boiling solution. However distillation does not completely purify water, because of contaminants with similar boiling points and droplets of un vaporized liquid can be carried with the steam. Still, 99.9% pure water can be obtained by distillation. Distilling results in high-quality water; however an enormous amount of energy is required for this process. In situations where large quantities of high-quality water is needed (as for the washing process and steam sterilization in the CSSD), other methods, such as water softening, de-ionizing and reverse osmosis are used. |
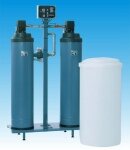 Figure 30: Water softener for continuous use (double unit). The white vessel contains salt, used for regeneration of the resin. |
Water softening by ion-exchanging |
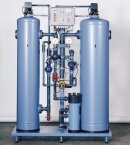 Figure 31: A two-step ion-exchanger for demi-water production |
De-ionization by two-step ion-exchanging |
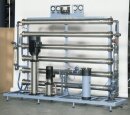 Figure 32: Reverse-osmosis unit |
Reverse osmosis: also known as hyperfiltration. Mechanical pressure is applied to the impure solution which is forced through a semi-permeable membrane. When the pore size of the membrane is approx 0.0005 micron (compare to bacteria, which are 0,2-1 micron). The term is reverse osmosis, because normal osmosis would result in pure water moving in the other direction to dilute the impurities. Reverse osmosis is theoretically the most thorough method of large-scale water purification available. As the membrane is very sensitive to damage by Chlorine, metal ions and other impurities, usually water filters and water softening systems are used in combination with the Reverse Osmosis unit. |
| TOP | CONTENTS | PREVIOUS | NEXT | BOTTOM |
Chemicals used in the cleaning process
For the total cleaning process one or more chemicals are used. In manual cleaning usually a single detergent is sufficient. However in machine washing, a number of chemicals are used, which are applied in the individual steps of the cleaning/disinfection process. Chemicals used for cleaning are the result of advanced research, and provide adequate cleaning action for the target soils and processes they are designed for. Recently the environmental impact and safety in relation to chemical products came more and more important and resulted in new, more environmentally-friendly products.
Automatic washer/disinfectors are equipped with dosing systems, which can be programmed to inject the required amount of each individual chemical at the right moment in the process.
Your supplier can advise you about which products are most suitable for your specific situation. This section briefly describes the most important products used in the cleaning/disinfection process.
Detergents/cleaning agents
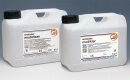 Figure 33: Cleaning agent and rinse aid for automatic washer disinfectors. |
These products are the main chemicals used in the cleaning process. They may contain surfactants, alkali, enzymes, corrosion inhibitors, solvents etc. For the cleaning of surgical instruments, dedicated cleaning agents have been developed with the typical soils found on used instruments in mind. Products are available for manual cleaning and automatic washer disinfectors. Also for delicate instruments such as flexible endoscopes dedicated products are available. |
Detergents have the following main ingredients:
Surfactants: soap and detergents
Surfactants are an important component of a cleaning agent; they decrease the surface tension of the water and enable the suspension of fats and oils into water (see also Improving cleaning capability of water: Surfactants (tensides). Soap and detergents are surfactants. Soap is based on fats of animals and plants whereas detergents are synthetic petrochemical substances. Detergents can be engineered for specific purposes. A wide range of surfactants are available and are used depending on their application. They are divided in 3 major groups. Depending on the charge of the active part of the surfactant, they are known as Cationic, Anionic and Neutral or Non-ionic. For detailed information refer to relevant documentation/websites.
Alkali
Alkali are substances which in a water react alkalic (they bring OH- ions in the detergent solution). They are substances such as Ammonia (NH3), Soda (Na2CO3), Phosphates, Silicates and Hydroxides (Sodium hydroxide: NaOH) and Potassium hydroxide (KOH). The alkali have a number of functions:
- They ensure optimized activity of the surfactants.
- The alkalic solutions are used for removing fats and oils. When fats and oils are reacting with a base they change into fatty acids and glycerine, which all are water soluble. The fatty acids themselves even are tensides and thus stimulate emulsification of the fats. This process is known as saponification. In this way fatty substances are relatively easily removed.
- Also some alkali (e.g. phosphates) can bind hardness ions (Ca2+ and Mg2+), which are in the water or soils.
Builders
These are chemicals, which bind the hardness ions: Calcium and Manganese. By binding them they prevent deposits of hardness scale. Examples are Phosphates, Phosphanates. A major problem of the phosphates has been the dramatic increase of algae growth in surface water, in quantities that they could not be broken down rapidly enough. That is why recently the use of phosphates is discouraged and new substances were looked after, which are more environmentally friendly. Substances known as Zeolites now have become in use as builders. They exchange sodium ions with the hardness ions. The quantities/formulation for builders will depend very much on the water quality used for the washing. Surgical instruments usually cleaned in washer disinfectors, using de-ionized or demineralised water. That is why detergents for machine-washing of surgical instruments usually have hardly any builders included. Builders are used in common cleaning agents intended to be used with normal tap-water: dishwashing, laundry etc.
Corrosion inhibitors
Stainless steel is hardly affected by the detergent solutions. However aluminium is sensitive for the alkalic solutions of detergents. That is why, for the protection of aluminium materials, corrosion inhibiters are added. Usually they are Aluminium silicates. These chemicals cause a protective oxide layer on the aluminium.
Biocides
These are chemicals which kill (micro-) organisms such as bacteria, fungi, viruses. Usually these chemicals kill organisms by oxidation of the proteins of the living cell. Examples of biocides are hydrogen peroxide, peracetic acid, sodium hypochlorite and certain ammonium compounds.
In the cleaning process of medical equipment, the inactivation of organisms is usually done by high temperature of water (thermal disinfection). However anesthetic materials are often disinfected at 65°C with the use of a chemical disinfectant.
Enzymes
 Figure 34: Enzyme breaking down a large protein into smaller sections, which can be dissolved in water. The enzyme locks in (like a key in a lock) on weaker parts of the protein and cuts it at those positions. The enzyme itself is not affected and can perform many cuts |
An enzyme is, in biology, a special protein molecule whose function is to facilitate or otherwise accelerate most chemical reactions in cells. They are biological catalysts. That can break down large molecules such as proteins, fats and starch to smaller pieces, which then can be diluted in water. In this way stains caused by blood and fats can be removed. For breaking down each group of biological substances there are different, specific enzymes. For example proteases break down proteins; Lipases break down fats (lipids). In the process of breaking down these large molecules, the enzyme itself is not used up. When given sufficient time very small quantities can break down large amounts of proteins. As the soils of used surgical instruments contain much of the organic soils, cleaning agents for this purpose, may also contain enzymes. |
Neutralizers
Neutralisers are used when the main cleaning action is done with an alkalic cleaning agent. In order to prevent that the alkalic residues may affect the materials to be washed, the alkality is reduced by applying an acid in the water during a neutralizing phase. Usually the acids are weak acids such as citric acid. Also phosphoric acid is used. Neutralizers are only necessary when alkaline cleaning agent was used.
 Figure 35: Damage to the steel surface due to friction. Lubricants create a layer, which prevent damage to the steel surface. |
Lubricants |
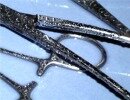 Figure 36: Instruments with water droplets due to surface tension. A rinse aid will cause the droplets to spread over the steel surface. |
Rinse aids |
| TOP | CONTENTS | PREVIOUS | NEXT | BOTTOM |
Importance of intermediate rinsing after cleaning
After the cleaning process has taken place, chemicals may be left on the instruments and materials. When not rinsed properly or when water of poor quality is used for rinsing (with many minerals in it). these chemicals may be left on the surface. These left-overs, they can cause serious damage to the instruments, during drying and especially when subsequent sterilization in steam, where the moist environment can easily cause corrosion. That is why it is essential that after cleaning, the load is rinsed thoroughly. Preferably, rinsing is done with high quality water: e.g. water prepared by de-ionization or Reverse Osmosis.
| TOP | CONTENTS | PREVIOUS | NEXT | BOTTOM |
Disinfection and drying
In most washer disinfectors, as the name already indicates, the intermediate rinsing will be followed by a disinfection phase, by rinsing with hot water, usually approximately at 90°C for 1 minutes; 80°C for 10 min or 70°C for 100min (EN15833).
In this way, materials for which disinfection is sufficient then are ready for use; others will be sufficiently safe for subsequent handling in the CSSD where they are prepared for sterilization.
| TOP | CONTENTS | PREVIOUS | NEXT | BOTTOM |
Cleaning methods in the Central Sterilization Department
Depending on materials to be cleaned and resources available cleaning will be done in different ways. Some materials can be washed in automatic washer/disinfectors. Others can only by cleaned by hand. In many cases a combination of manual and machine washing will be used.
Manual CleaningIn order to reduce risk, any cleaning that can be done by machine is done so. As manual cleaning is the most risky task within CSSD, whenever possible, cleaning is done by machines. Manual cleaning is done when machine cleaning is not possible. |
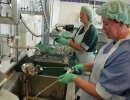 Figure 37: Manual Cleaning |
Manual cleaning can be done using a range of cleaning aids:
 Figure 38: Brushes in all shapes and sizes |
Brushes: external and internal |
 Figure 39: Sponge or towel |
Sponge or towel |
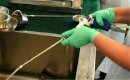 Figure 40: Spray gun |
Spray gun |
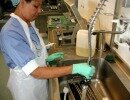 Figure 41: Hand shower |
Hand shower |
Pre-flushers
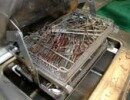 Figure 42: Instrument flusher |
Instrument flusher |
Ultrasonic cleaning: the microscopic "brush"
For adequate cleaning the mechanical action is essential, in order to break up the soil-layer and thus to allow the cleaning agent to penetrate the soiled surface, break it down in smaller particles and take the contaminants into suspension. Normal cleaning by brushes, flushing etc. will not be able to reach all surfaces. By ultrasound, the water is shaken at speeds above sound. It is like brushing at a speed higher than the vibrations of sound. It has the advantage that the cleaning action can take place at any location in or on an instrument where water can reach.
Principle of ultrasonic cleaning
 Figure 43: The water/steam curve: when at a given temperature the pressure on the water decreases beyond the curve, the water will evaporate. 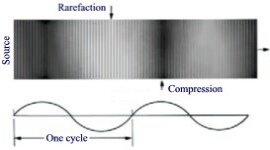 Figure 44: Ultrasonic waves with areas of increase and decrease of pressure |
Basics: Water cavitation |
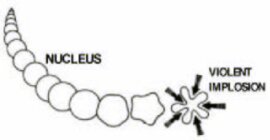 Figure 45: Due to quick pressure reduction in the water, cavities are formed in the water, which collapse as pressure rises. |
Microscopic brush: Caused by cavitation |
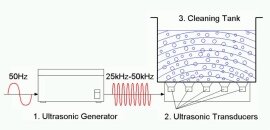 Figure 46: Main components of ultrasonic cleaner |
Components of an Ultrasonic cleaner |
Application
Ultrasonic treatment can be very well used for stainless steel instruments. Especially for instruments sensitive to mechanical impact: microsurgical instruments; dental instruments.
Do NOT use ultrasonic cleaning for
Flexible endoscopes. They should NEVER be treated in ultrasonic bath
Elastic materials. They absorb the ultrasonic waves and will weaken the cavitation to occur and thus there will be a less effective cleaning action. Therefore elastic materials such as rubber ware and materials of silicone should not be put in an ultrasonic cleaner.
Of MIS instruments or rigid endoscopes only those components can be cleaned by ultrasound that the manufacturer approves in its instructions. Usually optical systems should NOT be cleaned in an ultrasonic bath.
Ultrasonic cleaning equipment
Ultrasonic cleaners are available as smaller table top units and large basins integrated in working tables, sinks etc. They can be suitable for taking one or more standard instrument trays. Ultrasonic cleaning units may also be integrated in automatic washer disinfectors (takt machines).
An unprotected ultrasonic bath causes an irritating high-pitch sound. Moreover at the surfaces aerosols may form. That is why an ultrasonic bath should have an adequate lid. Larger Ultrasonic baths are equipped with a mechanism, which lifts out the content when opening the lid.
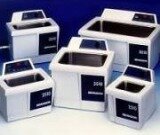 Figure 47: Desktop ultrasonic cleaners |
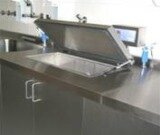 Figure 48: Ultrasonic cleaning basin, integrated in a work bench |
 Figure 49: Ultrasonic cleaner with lifting system for trays; with lid, reducing noise |
Guidelines for ultrasonic cleaning
- In order to prevent ear irritation the unit should be equipped with a lid.
- Fill bath according to instructions of the manufacturer.
- Use a cleaning agent or combined cleaning/disinfection agent in concentrations and temperatures as recommended by the manufacturer.
- Make sure the bath is degassed. Any gases in water reduces the cavitation and thus the cleaning effect. Therefore use warm water, preferably upto 40°C. This will stimulate degassing, thus improving the cleaning results. It however should not be above 60°C to prevent coagulation; or, it is necessary to add a suitable detergent that will prevent protein coagulation.
- Make sure that all items to be treated are fully immersed.
- Hinged instruments should be opened.
- Do not overload trays.
- Renew the ultrasonic bath at least twice a day. If necessary more frequently, depending on the conditions of use.
Testing performance of ultrasonic cleaners
There are two simple tests for checking the performance of your ultrasonic cleaner:
a. Glass slide test
Wet the frosted portion of a glass slide with tap water and draw an "X" with a No. 2 pencil from corner to corner of the frosted area. Making sure that the tank is filled to the fill line, immerse the frosted end of the slide into fresh cleaning solution. Turn on the ultrasonics. The lead "X" will begin to be removed almost immediately, and all lead should be removed within ten seconds.
b. Aluminium foil test
Several tests using aluminium foil have been described. You can use the following procedure: Cut three small pieces of aluminium foil about 10cm x 20cm each. Fold each piece over a rod that you will use to suspend the foil in the tank. A clothes hanger works well. Your cleaner should be filled with an ultrasonic cleaning solution, degassed, and brought up to normal operating temperature. Suspend the first "square" in the center of the tank and the other two a couple of inches from each end of the tank. Make sure that the tank is filled to the fill line, and turn on the ultrasonics for about ten minutes. Remove the foil and inspect: All three pieces of aluminium foil should be perforated and wrinkled to about the same degree. Another test recommends the use of 9 strips of aluminium foil, 15mm to 20 mm wide, suspended within 10 mm of the bottom of the tank, but not touching it. Other tests recommend the use of 9 strips of aluminium foil 15mm to 20 mm wide suspended within 10 mm of the bottom of the tank, but not touching.

|

|
|
| Figure 50: Aluminium foil tape for testing ultrasonic cleaners. You can also use house hold aluminium foil! | Figure 51: Foil after inadequate cavitation (magnification 10 x). No perforations! | Figure 52: Adequate cavitation: The foil is perforated (magnification 10x) |
c. Chemical indicators for checking cavitation
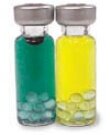 Before - After Figure 53: The vial with the cavitation indicator (measuring about 1cm diameter, and 2 cm high). It contains glass beads and a chemical, which initially is green. When exposed to an adequate ultrasonic cleaning cycle, its colour will change from green to yellow within several seconds. |
Recently also chemical indicators appeared on the market, which can be used for checking the correct operation of an ultrasonic bath. It actually verifies the cavitation capability of the ultrasonic bath. The cavitation triggers a chemical reaction in the test fluid, causing a clear colour change. The test device is a closed vial/capsule containing the fluid with glass beads in it. The vial is put in the ultrasonic bath, which is switched on at specified frequency, time and temperature. When an effective cavitation is reached, the colour of the fluid in the vial changes from green to yellow. Advantage of this system is that it can be used together with the load to be cleaned. |
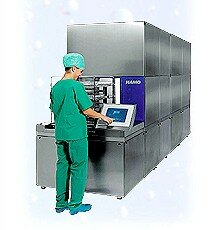
Cleaning with automatic washer/disinfectors
As the name indicates a washer/disinfector runs a washing cycle, followed by a disinfection phase. Disinfection is performed by flushing with hot water of approximately 90°C for 1-10 minutes. The machine renders equipment clean, disinfected and dry: ready/safe for further handling, required for inspection and packaging. The machines are fast and are easy to operate. They usually have programmes for different types of loads. Within the European Community new washer disinfectors should meet the European Standard EN13886.
Typical cleaning/disinfection process in an automatic washer disinfector
The following diagram shows the phases of a typical cleaning process in a washer disinfector. Details may differ for various manufacturers and individual models.
 Figure 54: Typical cleaning process for an automatic washer/disinfector |
Pre rinse: Initial rinsing of the load with cold water. A major part of the soils are flushed away. The temperature should not exceed 35°C.
Cleaning: The detergent is added and the water is heated up to approx. 45-55°C. The major cleaning takes place during this phase. Note: For alkalic cleaning agents, higher temperatures may be used.
Neutralisation. When an alkalic cleaning agent was used, the water is chemically neutralized in order to prevent corrosion.
Intermediate Rinse. All remaining soils are carefully washed away with cold fresh water.
Disinfection at 90-95°C for approx 1-10 minutes. A rinse-aid containing a surfactant may be added which will reduce the drying time. Time and temperature will depend on the load.
Drying. In order to prevent recontamination it is essential that the load is dry by the time it is removed.
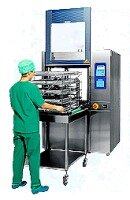 Figure 55: Batch type washer disinfector with automatic door. A glass window allows seeing what's happening inside. 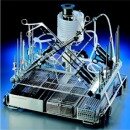 Figure 56: Load carrier (insert) for hollow instruments. In order to ensure that hollow instruments (e.g. for MIS) are also cleaned inside, each individual instrument is connected to the water flushing system. |
Batch type washer/disinfectors Advantages of these machines are
In case still larger capacities are needed the installation of tunnel washers can be considered. Batch washer/disinfectors can be equipped as single door or double door units (Pass-through type). The pass-through type is recommended as it forces separation of the clean and dirty area, thus reducing chances for cross infection. The doors should be interlocked, making sure that only one door can be open at a time. Doors may be manually operated or can be fully automatic powered doors. When high capacity is needed multiple units can be fed by an automatic loading and unloading system. |
 Figure 57: Simplified diagram for typical batch type automatic washer disinfector |
  Figure 58: A tunnel-washer with four compartments |
Tunnel washer/disinfectors |
 Figure 59: Diagram of a tunnel washer, with the 4 chambers for each step of the cleaning process. Each phase can take place simultaneously. At any given moment there may be up to 4-8 trays being processed at the same time! |
Personal protection when cleaning
Medical supplies that were used in the operating theatre may be heavily contaminated by microorganisms when they arrive at the department for cleaning. Thus cleaning is considered the most dangerous section of the sterilization department. In order to reduce the risks it is essential that precautions are taken to ensure safe handling during the cleaning process.
A first major principle is to limit contact with the materials as much as possible. That is why machine-cleaning is recommended whenever possible.
For protection during manual cleaning a range of materials is available
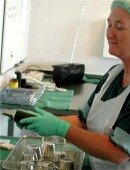 Figure 60: During cleaning always wear gloves and apron |
Gloves |
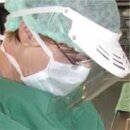 Figure 61: Mouth mask and visor  Figure 62: Goggles/visor |
Mouth mask, visor and goggles |
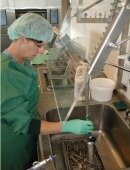 Figure 63: Splash screen |
Splash screen |
| TOP | CONTENTS | PREVIOUS | NEXT | BOTTOM |
Quality control for cleaning
It is essential to know whether the cleaning process results in adequately clean equipment. Quality control in cleaning is currently a topic that is heavily under discussion and various test methods are being developed in order to verify the adequate cleaning. According to the new standard for automatic washer/disinfectors (prEN15883) the cleaning performance has to be validated for each type of load. This resulted in the development of standard test soils and process challenge devices for cleaning processes.
 Figure 64: Visual inspection |
Visual inspection |
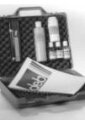 Figure 65: Test kit with UV lamp, fluorescent powder and fluid. |
 Figure 66: Unclean areas light up bright |
Fluorescent powder and fluids with Ultra Violet light |
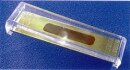 Figure 67: The TOSI: The strip is covered with a standardized test soil 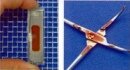 Figure 68: Simulating blood |
Test Object Surgical Instruments |
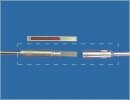 Figure 69: Test object for hollow instruments |
Test object for hollow instruments |
 Figure 70: Test object for flexible endoscopes |
Test object for flexible endoscopes |
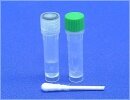 Figure 71: Protein Test |
Protein Test |
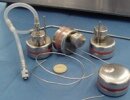 Figure 72: Solid state data loggers for temperature, that can be used for the validation of cleaning processes |
Data loggers |
 Figure 73: Validation of washer disinfectors became a requirement |
Validation of washer/disinfectors
|
| TOP | CONTENTS | PREVIOUS | NEXT | BOTTOM |
General guidelines for cleaning practice
- Whenever possible instruments should be cleaned and disinfected immediately after use.
- Always clean brand-new instruments prior to first sterilization.
- Carefully follow the Instructions for Use.
- Strictly adhere to dosage, exposure time and temperature specifications provided for cleaning and disinfection.
- Always open hinged instruments prior to preparation.
- As far as possible, disassemble all instruments before treating them.
- Be sure to use only suitable cleaning tools and accessories.
- Do not overload washing machines and ultrasonic cleaning devices. Prevent the formation of "shadows" and anechoic zones.
- Never use metal brushes or metal sponges for manual cleaning.
- Rinse thoroughly and carefully after cleaning. If possible, use demineralized water.
- Dry sufficiently after rinsing.
- Worn, corroded, deformed, porous or otherwise damaged instruments must be sorted out and discarded.
- For hygienic reasons, instruments must be sent through the complete preparation cycle before they are submitted for repair.
- Hinged/jointed instruments must be treated with a paraffin oil-based lubricant (not applicable to flexible endoscopes and accessories).
- Following assembly, subject each instrument to a functional test. Hinged instruments must be lubricated prior to carrying out the test.
- Instruments with a ratchet should only be closed at the first tooth/notch before sterilization.
- Sterilization is no substitute for cleanliness!
Taken from: Proper Maintenance of Instruments, Working Group Instruments Preparation, ArbeitsKreis Instrumenten-Aufbereitung, 1999.
| TOP | CONTENTS | PREVIOUS | NEXT | BOTTOM |
Normative references (European)
Cleaning should meet minimum requirements that have been formulated by the CEN (European Standards Commission):
| prEN ISO 15883 Parts 1-4 |
Washer-Disinfectors The standard describes:
|
| TOP | CONTENTS | PREVIOUS | NEXT | BOTTOM |
Recommended literature related to cleaning
- Proper Maintenance of Instruments, Working Group Instruments Preparation, ArbeitsKreis Instrumenten-Aufbereitung, 1999
- Testseries and Statements, Working Group Instruments Preparation, ArbeitsKreis Instrumenten-Aufbereitung, 1999
-
Ultrasonic Cleaning: Fundamental Theory and Application, F. John Fuchs,
http://www.blackstone-ney.com/04.TP_fundamentals_1.php -
Infection Prevention Guidelines for Healthcare Facilities with Limited Resources
http://www.reproline.jhu.edu/video/hiv/tutorials/tutorials/IP/references/IP_manual/IP_manual_TOC.htm
| TOP | CONTENTS | PREVIOUS | NEXT | BOTTOM |
Websites related to cleaning
General information on instrument cleaning
- Site of the Working group for Instrument Preparation
http://www.a-k-i.org/englisch/lit.htm
Endoscope cleaning
Water: physics and chemistry
- A gentle introduction to water and its structure
http://www.chem1.com/acad/sci/aboutwater.html - Water, Properties and Behaviour
http://www.visionlearning.com/library/module_viewer.php?mid=57 - H2O - The Mystery, Art, and Science of Water
http://witcombe.sbc.edu/water/introduction.html - Clear explanation of different types of water treatment (excellent German site):
http://dc2.uni-bielefeld.de/dc2/haerte/index.html
Soaps and detergents
- Theory on soaps and detergents
http://www.sdahq.or/cleaning/soaps_and_detergents.html - Excellent, clear explanation of soaps:
http://www.cavemanchemistry.com/cavebook/chsoap2.html - Clear explanation on soaps and detergents (excellent German site):
http://www.chemieunterricht.de/dc2/wsu-haush/kap_inh.htm
http://www.chemieunterricht.de/dc2/haus/tenside.htm
Ultrasonic cleaning
- http://www.blackstone-ney.com/04.TP_fundamentals_1.php
- http://www.bransoncleaning.com/ppg/index_bp.html
| TOP | CONTENTS | PREVIOUS | NEXT | BOTTOM |
Sources of photos/illustrations
Note: The photographs/illustrations not mentioned here are made by the author.
|
Fig. 4 Fig. 23 Fig. 26 Fig. 35 |
Working group for Instrument Preparation, Germany. www.a-k-i.org |
| Fig. 22 | Prof. Dr. Rüdiger Blume Universität Bielefeld, Fakultät für Chemie; Bielefeld, Germany. www.chemieunterricht.de |
|
Fig. 27 Fig. 28 Fig. 30 Fig. 31 Fig. 32 |
Silhorko-Eurowater A/S, Skanderborg, Denmark. www.eurowater.com |
| Fig. 29 | Barnstead, Boston, USA. www.barnsteadthermolyne.com |
|
Fig. 33 Fig. 36 |
Dr. Staffeldt, Chemische Fabrik Dr. Weigert GmbH & Co. KG, Germany. www.drweigert.de |
| Fig. 38 | Spectrum Surgical Instruments Corp. USA. www.spectrumsurgical.com |
|
Fig. 43 Fig. 45 Fig. 47 Fig. 48 |
Branson Ultrasonics Corporation USA. www.bransoncleaning.com |
| Fig. 50 | Sentry Products, United Kingdom. www.sentry-products.co.uk |
|
Fig. 51 Fig. 52 Fig. 53 Fig. 67 Fig. 68 Fig. 69 Fig. 70 Fig. 71 |
Pereg GmbH, Germany. www.pereg.de |
|
Fig. 55 Fig. 56 Fig. 57 |
HAMO AG Reinigungs und Hygienetechnik, Pieterlen/Biel, Switzerland. www.hamo.com |
|
Fig. 58 Fig. 59 Fig. 73 |
Belimed GmbH, Germany. www.belimed.de |
| Fig. 62 | Medisafe, UK. www.medisafeuk.com |
| Fig. 65 | Deb Benelux bv., The Netherlands. www.deb.nl |
| Fig. 66 | Missionsärztliches Institut, Wuerzburg, Germany. www.uni-wuerzburg.de/missio |
| Fig. 72 | Ebro Electronic GmbH & Co, Germany. www.ebro.de |
| TOP | CONTENTS | PREVIOUS | NEXT | BOTTOM |
© 2011 WFHSS • Updated: 30 October 2010, 10:56 [GMT]